Hair Mapping: Identifying Damage Patterns from Tight Hairstyles
Introduction: The Art of Hair Mapping Damage Patterns
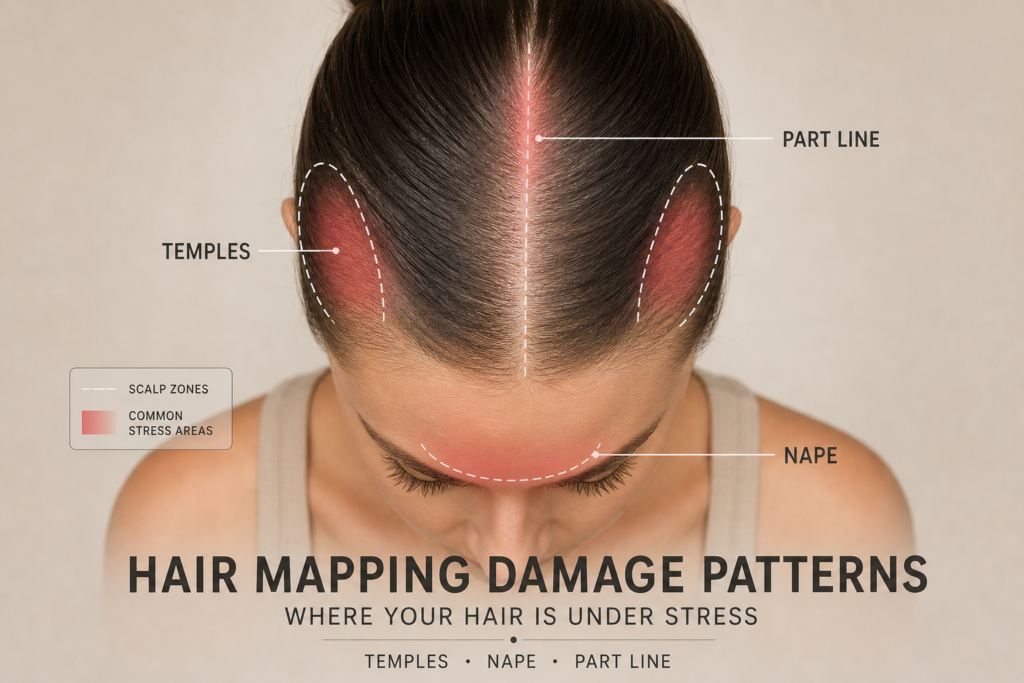
Hair mapping damage patterns help you see where your hair is under stress. Instead of guessing, you look at specific spots on your scalp.
Sometimes breakage looks random. However, it often follows a clear pattern caused by how you style your hair. Tight ponytails, braids, and buns can pull the same areas every day. Over time, those spots weaken first.
Before you go deeper, make sure you are not confusing this with normal shedding. Check your Shedding vs. Breaking Guide (Post 1) to be sure.
Mechanical Stress: Why Hair Mapping Damage Patterns Occur
Hair breaks when it faces too much tension. In simple terms, the tighter you pull, the more stress your hair feels.
This follows a basic rule:
[
Tension = \frac{Force}{Area}
]
When you gather hair into small, tight sections, the force increases on fewer strands. As a result, those strands carry more load.
Over time, this leads to follicular ischemia. That means less blood reaches the hair root. Because of this, the follicle starts producing thinner and weaker hair.
At first, you may not notice it. Then, the hairline starts looking lighter. Eventually, breakage becomes visible.
This type of stress is a major reason why hair breakage happens. You can learn more in The Root Cause of Why Hair Breakage Happens (Post 2).
Identifying the Zone: Common Hair Mapping Damage Patterns
Now, look at your scalp like a map. Different styles damage different zones.
1. Temporal Recessions (Edges)
These appear around your temples.
They are often caused by tight ponytails or slick-back styles.
You may notice thinning edges first. Then, small gaps begin to form.
2. Nape Breakage
This happens at the back of your neck.
It is usually caused by heavy extensions or friction from clothes.
Scarves and collars can rub this area daily. Because of this, the hair becomes short and uneven.
3. Part-Line Widening
This shows up along your hair part.
It is common with long-term braids or heavy locs.
At first, the line looks slightly wider. Later, the scalp becomes more visible.
Reclaiming Resilience: Fixing Hair Mapping Damage Patterns with Yara
Once you spot your hair mapping damage patterns, the next step is repair. Surface care alone will not fix weak follicles.
This is where Yara Hair Growth Serum supports recovery.
Why it helps
- Vascular support: Helps improve nutrient flow to stressed follicles
- Silica strength: Horsetail and bamboo extracts build stronger strands
- Cell renewal: PABA supports healthier, consistent growth
- Visible volume: Helps improve thickness and reduce shedding over time
Because of this, damaged zones begin to recover gradually.
Call to action:
Heal your hairline and restore weak areas with Yara Hair Growth Serum.
The Final Protocol for Hair Mapping Damage Patterns
Repair takes time. However, the right routine makes a big difference.
The 8-Week Rule
Avoid tight styles for at least 8 weeks.
This gives your follicles time to recover.
Low-Manipulation Plan
- Wear loose styles instead of tight ones
- Avoid daily pulling on the same area
- Reduce heat and harsh treatments
- Keep your scalp clean but not over-washed
Small changes protect your hair from further damage.
Mapping your damage is the first step. After that, focus on protection and repair.
For a full system on long-term results, see The Ultimate Roadmap: How to Stop Hair Breakage for Good (Post 30).